In this blog, we’ll walk you through what to do after setting up Selenium, including writing your first test, handling locators and waits, structuring your project, integrating Pytest, and generating HTML reports.
Step 1 – Write Your First Test Script
Start by launching a browser and opening a website:
from selenium import webdriver
from selenium.webdriver.common.by import By

driver = webdriver.Chrome()
driver.maximize_window()
driver.get("https://technochords.com/")
Step 2 – Interact with Web Elements
Next, interact with page elements using Selenium locators:
driver.find_element(By.XPATH, "//span[normalize-space()='Blogs']").click()
Common Locator Strategies:
- By.ID
- By.NAME
- By.CLASS_NAME
- By.XPATH
- By.CSS_SELECTOR
You might encounter errors like:
- NoSuchElementException
- ElementNotVisibleException
Solution: Use Explicit Waits
from selenium.webdriver.support.ui import WebDriverWait
from selenium.webdriver.support import expected_conditions as EC

wait = WebDriverWait(driver, 10)
wait.until(EC.presence_of_element_located((By.XPATH, "//span[normalize-space()='Blogs']"))).click()
Step 3 – Organize Your Test Script
selenium_test_framework/
├── tests/               # Test cases
│   └── test_home.py
├── pages/               # Page classes (POM)
│   └── home_page.py
├── reports/             # Test reports
etc…

Example: pages/home_page.py

from selenium.webdriver.common.by import By
class HomePage:
    def __init__(self, driver):
        self.driver = driver
        self.blogs_button = (By.XPATH, "//span[normalize-space()='Blogs']")

    def open(self, url):
        self.driver.get(url)
        self.driver.maximize_window()

    def click_blogs(self):
        self.driver.find_element(*self.blogs_button).click()


Example: tests/test_home.py

from selenium import webdriver
from webdriver_manager.chrome import ChromeDriverManager
from pages.home_page import HomePage

def test_click_blogs():
    driver = webdriver.Chrome(ChromeDriverManager().install())
    home = HomePage(driver)

    home.open("https://technochords.com/")
    home.click_blogs()

    assert "blog" in driver.current_url.lower()
    driver.quit()
Step 4 –Integrate Pytest for Generating Reports
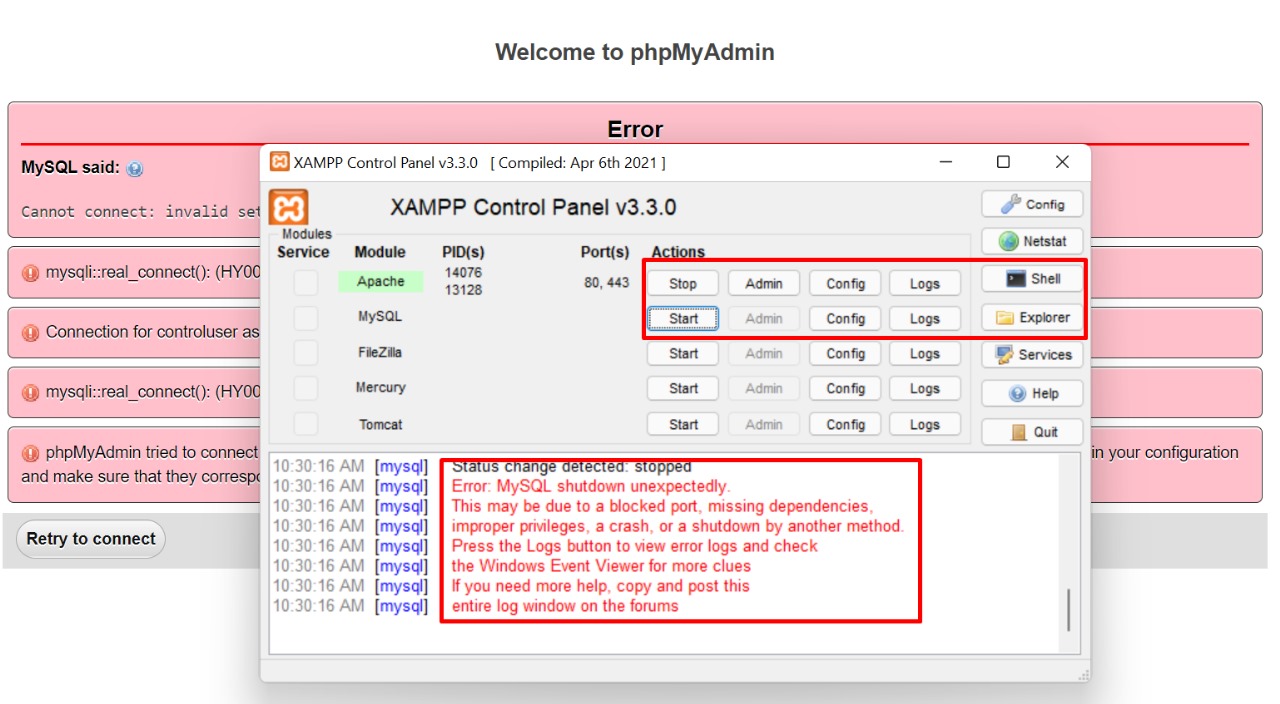
Install Pytest:
pip install pytest

Check Installation:
pytest --version
You might encounter errors like: ‘pytest’ is not recognized as an internal or external command, operable program, or batch file.
Solution:
- Check if pytest is Installed
pip list
- Check PATH Variable (For Windows Users)
pip show pytest
Output might show:
Location: C:\Users\<your-username>\AppData\Local\Programs\Python\Python39\Lib\site-packages
Locate the scripts folder in that directory:
cd C:\Users\<your-username>\AppData\Local\Programs\Python\Python39\Scripts
Add the Scripts folder to the PATH:
Add the Scripts folder (e.g., C:\Users\<your-username>\AppData\Local\Programs\Python\Python39\Scripts) to your PATH variable. Once added, restart your terminal, and the pytest command should work.
Naming Conventions:
– File names must start with test_ or end with _test.py
– Test functions must start with test_
Step 5 –Generate Test Reports with pytest-html
Install pytest-html:
pip install pytest-html
Generate a Report:
pytest --html=report.html