🔐 Automating Login Page Test Cases with Pytest and Generating HTML Reports
Automated testing plays a critical role in ensuring the reliability and performance of web applications. In this tutorial, we’ll show you how to automate login page test cases for the OrangeHRM Demo site using Selenium and Pytest, and generate a professional HTML report summarizing your test results.
Whether you’re a QA engineer, a developer, or a test automation beginner, this guide helps you set up robust UI test cases quickly.
🚀 Why Automate Login Tests?
Login pages are often the entry point to web applications, and ensuring their reliability is key. Automating these tests brings the following benefits:
-
🧪 Repeatability – Run the same tests consistently
-
⚡ Speed – Save time on manual testing
-
🛡️ Accuracy – Catch regressions or broken functionality early
-
📊 Reporting – Detailed reports help debug failed tests
📁 Step 1: Set Up the Project Directory
Begin by creating a directory to store all your test files:
mkdir testcases
cd testcases
This the testcases folder will house your Selenium scripts and configuration files.
⚙️ Step 2: Create Required Test Files
Inside the testcases directory, create the following files:
conftest.py– to handle browser setup and teardowntest_login.py– to write all login test cases
🛠️ Step 3: Configure Selenium WebDriver (conftest.py)
The conftest.py file initializes the Chrome browser using WebDriver Manager, ensuring the appropriate driver version is installed automatically.
import pytest
from selenium import webdriver
from selenium.webdriver.chrome.service import Service
from webdriver_manager.chrome import ChromeDriverManager

@pytest.fixture(scope="session")
def driver():
    driver = webdriver.Chrome(service=Service(ChromeDriverManager().install()))
    driver.get("https://opensource-demo.orangehrmlive.com/web/index.php/auth/login")
    driver.implicitly_wait(10)
    yield driver
    driver.quit()
✅ Step 4: Write Login Page Test Cases (test_login.py)
Now let’s write automated test cases that cover login form element visibility, required field validation, and login attempt scenarios:
import time
from selenium.webdriver.common.by import By

def test_login_elements_visible(driver):
    assert driver.find_element(By.NAME, "username").is_displayed()
    assert driver.find_element(By.NAME, "password").is_displayed()
    assert driver.find_element(By.CSS_SELECTOR, "button[type='submit']").is_displayed()
    print("Login elements are visible")

def test_login_button_is_clickable(driver):
    driver.find_element(By.CSS_SELECTOR, "button[type='submit']").click()
    time.sleep(2)
    assert driver.find_element(By.CSS_SELECTOR, "button[type='submit']").is_enabled()
    print("Login button is clickable")

def test_required_fields_validation(driver):
    driver.find_element(By.CSS_SELECTOR, "button[type='submit']").click()
    error_msg = driver.find_element(By.XPATH, "//body/div/div/div/div/div/div[2]/div[2]/form/div[2]/div/span")
    time.sleep(2)
    assert error_msg.is_displayed()
    assert error_msg.text
    print("Error message displayed for empty fields")

def test_invalid_login(driver):
    driver.find_element(By.NAME, "username").send_keys("wronguser")
    driver.find_element(By.NAME, "password").send_keys("wrongpass")
    driver.find_element(By.CSS_SELECTOR, "button[type='submit']").click()
    error_msg = driver.find_element(By.XPATH, "//p[@class='oxd-text oxd-text--p oxd-alert-content-text']")
    time.sleep(2)
    assert error_msg.is_displayed()
    print("Invalid login handled successfully")

def test_successful_login(driver):
    driver.find_element(By.NAME, "username").send_keys("Admin")
    driver.find_element(By.NAME, "password").send_keys("admin123")
    driver.find_element(By.CSS_SELECTOR, "button[type='submit']").click()
    time.sleep(3)
    assert "dashboard" in driver.current_url.lower()
    print("Successfully logged in")
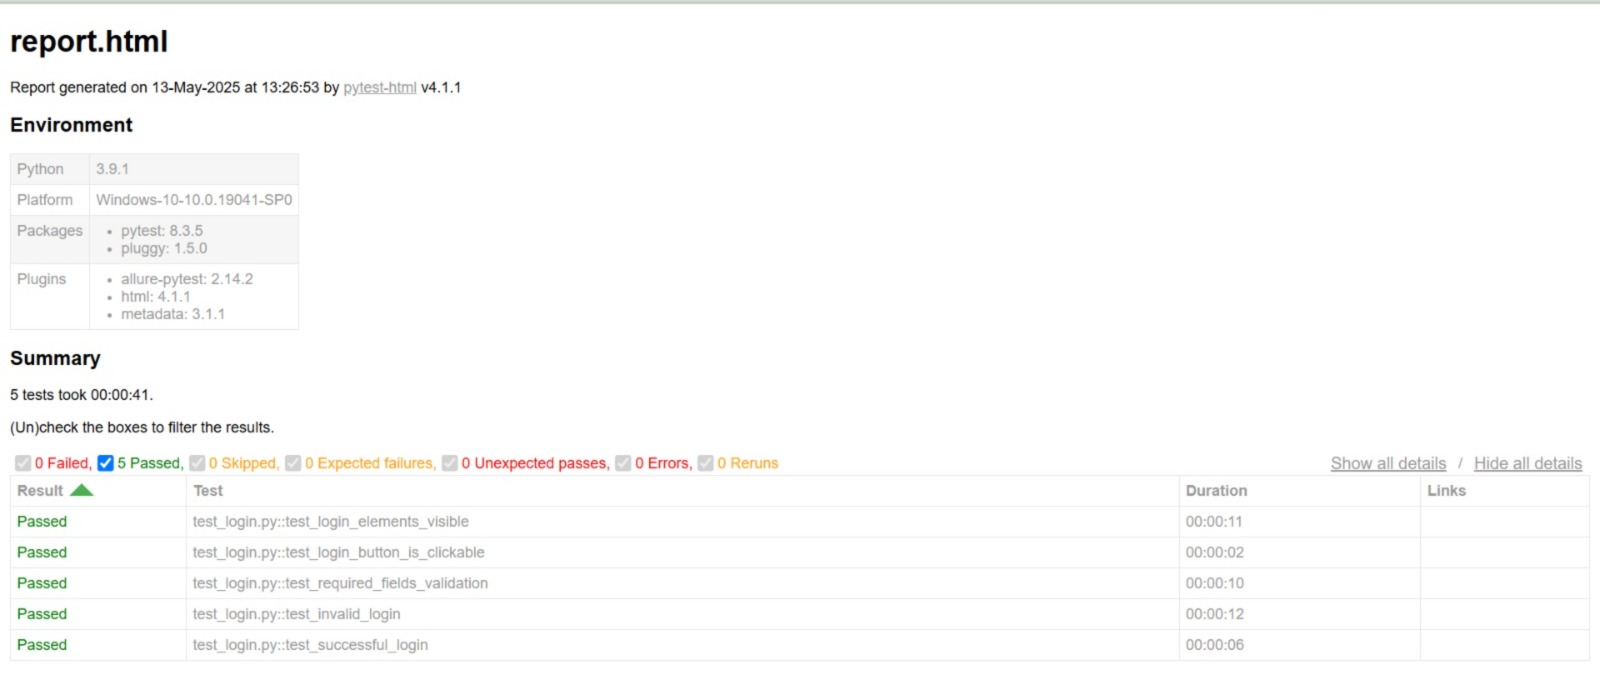
📄 Step 5: Generate HTML Test Report
To generate a beautiful, self-contained HTML test report, run the following command in your terminal:
pytest --html=report.html --self-contained-html
This creates a the report.html file that includes detailed information on:
- Passed ✅
- Failed ❌
- Skipped ⚠️
tests — all in a visually organized layout, viewable in any browser.
Screenshot:
🧰 Tools & Technologies Used
-
Python 3.x
-
Selenium WebDriver
-
Pytest
-
WebDriver Manager (for automatic ChromeDriver installation)
-
pytest-html (for HTML reports)
🔄 Next Steps & Suggestions
-
Add more test scenarios: remember me, forgot password, captcha
-
Parameterize tests with
pytest.mark.parametrize -
Use Page Object Model (POM) for better scalability
-
Integrate with CI/CD (Jenkins, GitHub Actions)
-
Run cross-browser tests using Selenium Grid
🧠 Conclusion
Automating login tests with Selenium and Pytest helps you maintain application stability and speed up QA cycles. With detailed HTML reports, debugging and collaboration also become easier.
Make testing part of your development culture — automate early, automate often! 💡
🚀 Final Thoughts
By combining Pytest with Selenium and generating structured HTML reports, you can automate your regression testing workflows with confidence. This setup can easily be extended to cover other pages and functionalities of your web application.
Want to take it further? Try integrating this with CI/CD pipelines, or expanding test coverage to form validations, file uploads, and data tables!